Introduction
In this article, we will see how to connect a Cisco CP-8841-K9 VoIP phone (which has enterprise firmware on it) with a 3cx instance.
The problem
Since this phone has enterprise firmware and it is designed to be registered with Cisco call control systems like Cisco Unified Communications Manager (Unified CM), we can not connect it directly to 3rd party PBX's such as 3CX.
The solution
There are two solutions to solve this problem:
- The first and simplest solution is to purchase a license which converts the enterprise firmware 3PCC/MPP firmware. This provides standard web access and the ability to enter sip credentials directly on the phone. The downside of this solution is that the license has a cost: the official Cisco List Price is about $130.00 or $45.00-$65.00 to purchase it from a reseller.
- The second and free solution is to use a TFTP server with XML configuration files required for the phone to work. This is the option we will use to register the Cisco CP-8841 with 3CX.
The fix
Getting the sip credentials form 3CX
The SIP credentials of an extension will allow the ip phone to connect to it. Here is how to get them:
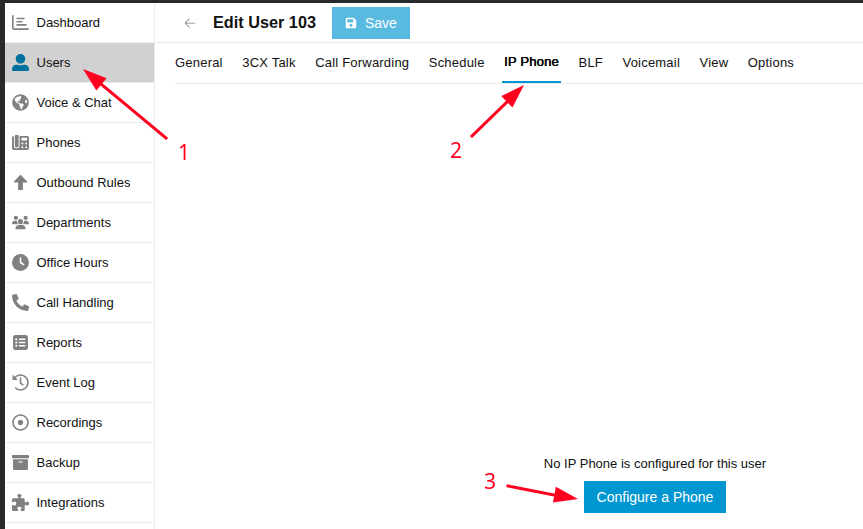
First, login to your 3cx admin page and then go to Admin>Users then to the extension you want to have the credentials from. After that, go to the IP Phone tab and click on Configure a Phone.
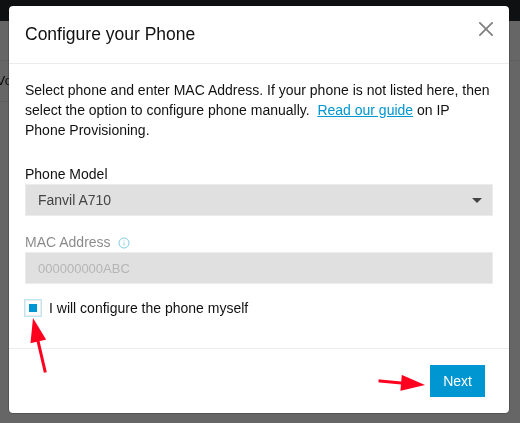
Then, a window will popup asking you to select your phone and model. Since our IP Phone is not supported by 3CX, we will check the box next to "I will configure the phone myself". Once you've done that, click on Next.
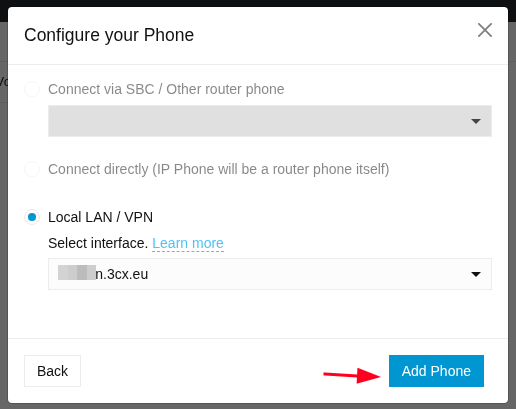
After that, another window will appear asking you if you want to connect the phone to directly your 3cx server (in that case, the server is probably on premise) or via an SBC (in that case the server is very likely a cloud instance, or simply in a different LAN from the phone).
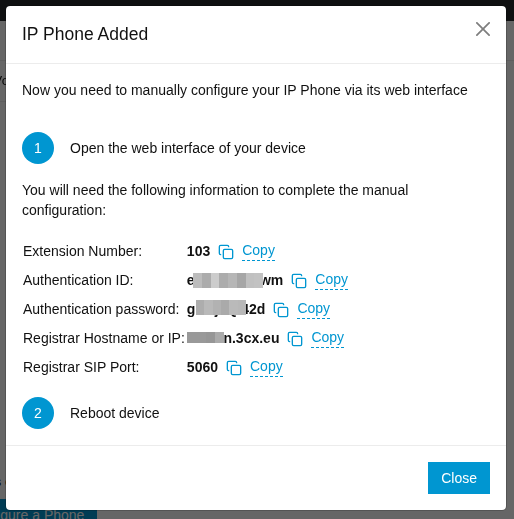
Lastly, the window with the SIP credentials will popup. These are the credentials we have to get
.
Setting up the TFTP server
There are many avalible options to host a TFTP server. For this tutorial we will use a raspberry pi. Keep in mind that the server will always have to be on. If the phone reboots and does not find the server, it will fail to register. That's why I use a raspberry pi, I can keep it running without consuming a lot of power.
Install the TFTP software
To install the TFTP software, run the following commands on the machine you want to have your TFTP server:
Update the system's apt repository and install the software:
sudo apt updatesudo apt install tftpd-hpa
Once installed, edit the configuration file at /etc/default/tftpd-hpa and you should have this configuration:
# /etc/default/tftpd-hpa TFTP_USERNAME="tftp" TFTP_DIRECTORY="/srv/tftp" TFTP_ADDRESS="0.0.0.0:69" TFTP_OPTIONS="--secure --create"
Note that you can edit the TFTP_DIRECTORY field to any directory you want. This will be your TFTP root directory.
Ensure the directory exists and has correct permissions:
sudo mkdir -p /srv/tftpsudo chown tftp:tftp /srv/tftpsudo chmod 755 /srv/tftp
Finally, restart the service to apply changes:
sudo systemctl restart tftpd-hpasudo systemctl enable tftpd-hpa
Creating the .xml configuration files
Now we will create the necessary configuration files in xml format for the phone. These will be the files the voip phone will look for after each boot. We will create 3 files, each one with a specific naming:
- SEP<MAC>.cnf.xml
- dialplan.xml
- xmldefault.cnf.xml
Note: The name if the first file is all in uppercase letters. Also, you will have to replace <MAC> with the actual MAC address (also uppercase) of your Cisco 8841.
First file:
Using the text editor of your choice, open the file and paste this code:
<device> <deviceProtocol>SIP</deviceProtocol> <sshUserId>admin</sshUserId> <sshPassword>cisco</sshPassword> <deviceConfigurationMode>Custom</deviceConfigurationMode> <webAccess>0</webAccess> <devicePool> <dateTimeSetting> <dateTemplate>D-M-Y</dateTemplate> <timeZone>GFT Standard/Daylight Time</timeZone> <ntp> <name>pool.ntp.org</name> <ntpMode>Unicast</ntpMode> </ntp> </dateTimeSetting> <callManagerGroup> <members> <member priority="0"> <callManager> <ports> <ethernetPhonePort>2000</ethernetPhonePort> <sipPort>5060</sipPort> </ports> <processNodeName>3CX_SERVER_IP</processNodeName> </callManager> </member> </members> </callManagerGroup> <powerSaveConfiguration> <daysDisplayNotActive> <day>1</day><day>2</day><day>3</day><day>4</day><day>5</day><day>6</day><day>7</day> </daysDisplayNotActive> <displayIdleTimeout>00:01</displayIdleTimeout> <displayOnDuration>00:01</displayOnDuration> <displayOnTime>00:00</displayOnTime> </powerSaveConfiguration> </devicePool> <sipProfile> <sipProxies> <registerWithProxy>true</registerWithProxy> </sipProxies> <sipLines> <line button="1"> <transportLayerProtocol>1</transportLayerProtocol> <featureID>9</featureID> <featureLabel>YOUR_NAME</featureLabel> <proxy>3CX_SERVER_IP</proxy> <port>5060</port> <name>YOUR_EXTENSION_NUMBER</name> <displayName>YOUR_NAME</displayName> <autoAnswer> <autoAnswerCondition>None</autoAnswerCondition> </autoAnswer> <authName>YOUR_AUTH_ID</authName> <authPassword>YOUR_AUTH_PASSWORD</authPassword> <contact>YOUR_EXTENSION_NUMBER</contact> </line> </sipLines> <bcsConnectTimeout>5</bcsConnectTimeout> <keepAliveEnabled>true</keepAliveEnabled> <subRoute>3</subRoute> <sipResourceAsmId>1</sipResourceAsmId> <dialTemplate>dialplan.xml</dialTemplate> </sipProfile> <voicemailNumber>VOICEMAIL_NUMBER</voicemailNumber> </device>
Values to replace:
- 3CX_SERVER_IP
- YOUR_NAME
- YOUR_EXTENSION_NUMBER
- YOUR_AUTH_ID (the one you got in step 1)
- YOUR_AUTH_PASSWORD (the one you got in step 1)
- VOICEMAIL_NUMBER (your system's voicemail number)
Once you have completed that, run this command to set the right permissions for the phone:
sudo chmod 644 /srv/tftp/SEP*.xmlsudo chown tftp:tftp /srv/tftp/SEP*.xml
Second file:
Using the text editor of your choice, open the file and paste this code:
<DIALTEMPLATE> <TEMPLATE match="*" timeout="4"/> </DIALTEMPLATE>
Again, you will need to set the correct permissions:
sudo chmod 644 /srv/tftp/dialplan.xmlsudo chown tftp:tftp /srv/tftp/dialplan.xml
Third file:
Paste this code in the file:
<Default> <callManagerGroup> <members> <member priority="0"> <callManager> <ports> <ethernetPhonePort>2000</ethernetPhonePort> <sipPort>5060</sipPort> </ports> <processNodeName>3CX_SERVER_IP</processNodeName> </callManager> </member> </members> </callManagerGroup> </Default>
Values to replace:
- 3CX_SERVER_IP
Again, you will need to set the correct permissions:
sudo chmod 644 /srv/tftp/xmldefault.cnf.xml && sudo chown tftp:tftp /srv/tftp/xmldefault.cnf.xml
Note: If your 3cx instance is hosted in the cloud
Configuring the IP Phone
This is the simplest step. We will enter the ip address of the TFTP server:
Go to settings by pressing the gear button on the phone and then go to Admin Settings>Ethernet setup>IPv4 setup and then scroll down using the arrow keys until you find Alternate TFTP. Turn it on and scroll down again to TFTP server 1. Press the Selct button and then you will be able to enter the IP address.
After that, you might need to reboot the phone for the settings to take effect. Just unplug the power cable, wait for a few seconds, and plug it back in.
That's it! You've now successfully registered a Csico CP-8841 IP phone with 3CX
Comments
yesss
thanks, it worked
Add new comment